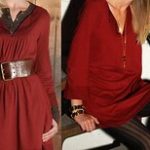
DIY fabric flower bracelet from an old sweatshirt

Did any of you join the overnight queue that formed at the first H&M opening in Singapore today? It’s amazing what fashion can do to people huh? I was nowhere near and anyway, prefer to avoid the crowd for I can’t shop when I see too many people. So today’s post is definitely not about H&M but it’s about a DIY fabric flower bracelet tutorial. Yes, my DIY interest has still not waned.
Easy to make
Fabric flowers are very pretty and I’ve learnt to make a few types. Here, I’m showing you one that takes just 15 minutes to make and all you need are two small pieces of fabric, a pair of scissors, thread and needle. For the purpose of recycling, I used the fabric from one of my son’s old sweatshirt.

Tutorial details
To make one fabric flower, what I did was to cut a square of around 12cm x 12cm from the old sweatshirt. Then I folded it into four small squares and then cut the corners round so that the square piece becomes something of a rounded shape. Okay, I admit I wasn’t precise in my measurements and so my square was really more like a rectangle. If you want to draw out a circle and cut that out, that’s also feasible. After that, what I did was to sew the edge of the fabric and then gather them together in the center before tying a knot. The last step is to push the edges into the center so that the gathers are not visible. And voila, you’ve got a pretty fabric flower – all done in under 15 minutes.

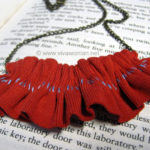
Dual flower effect
To get this dual flower effect, I basically made another smaller fabric flower and sewed the small one on top of the big one. To make it look more interesting, I sewed a button in the center. The fabric flower can be sewn onto clothes or made into a necklace. However, here, I’ve made it into a bracelet also using the fabric from the sweatshirt. The method was how I made the DIY t-shirt bracelet. The fabric flower is then sewn onto the bracelet.
Make an assortment of different sizes
You can visit Viva Woman Facebook Page to take a look at how to create the fabric flowers with the picture tutorial. The fun thing about this project is that you can make different sizes of the fabric flowers given that they’re easy to put together. What you want to put in the center of the flower is also your choice.
Related posts
Comments
Leave a Reply
You must be logged in to post a comment.


I did not go and Q. I happen to be there. The Q is horrible.
Emily Chia last post is: Haul from Sample Store and BHG
Ah, this is genius. Now I never want to throw away my old sweatshirts. ?
Chris last post is: Review: Dior 5 Couleurs Palette in Stylish Move
Hi Sesame, what’s the pink ribbon on the bottom right image on the 2nd picture? Is it the front or the back? ?
EcoBeauty last post is: DIY: Tomato and Oatmeal Leftovers Toning Mask for Oily Skin
Very craft-y, nice recycling!
Soos last post is: Last Saturday Storytime of August
Yeah, recycle…can do a few more stuff with them.
Ya…quite shocked at the queue I saw on the news. So surprised that pple actually queued overnight.
Haha…yes, I get into some of these moods sometimes. Was also into embroidery for awhile.
http://www.ohmysocute.com/japanese-inspired-embroidery-and-stitching/
The pink ribbon is just a replacement of the button in the center cos I wanted to see if it’ll turn out nice. The back is actually smooth and without gathers.
They do look so cute! I’m curious, do you have to insert something like a cardboard inside the fabric to hold the shape? Can’t see anything like that in your facebook page.
Amanda last post is: 8 Ways to Use Olive Oil for Beauty
No, I didn’t use anything inside. It holds well on its own since the size is not too big.
Thanks for this great tutorial!! I’m going to try this out next weekend!! #k8SjZc9Dxk#k8SjZc9Dxk It looks easy enough even for a person that is not skilled in DIY. lol
First H&M shop in Singapore? They’re surely expanding in Asia. I’ve been shooping at H&M for such a long time now that I totally lost count how much money I spent all over the years. sigh.
Lydia last post is: Favorite eyeliner brush
H&M has been making you part with $$$? Hmm…I have yet to check out their merchandise but going by the pictures, they look pretty decent. Affordability is a plus too.
Hope you’ll have fun with the tutorial too. ?
lovely! which reminds me that i am yet to learn stitching from a friend ? btw, the left bottom pic in the collage, looks like a xiao long bao
xin last post is: Cartoon Nail Art: Getting Ready to Smurf!
Yes, that’s what I thought too…should have it in white!
Thanks for this amazing tutorial. It’s really good for beginners like me.